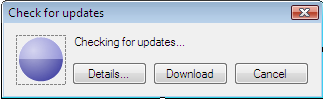
This form uses the CheckForUpdateAsync method and the CheckForUpdateCompleted event to check for updates.
The Custom Forms application utilizes methods and events on the Update Controller to check for, download, and apply an update. The application replaces the standard update engine user interface (displayed to the end-user as an update is being executed) with a completely custom UI. The concepts that you learn in this quick start can be used to design and implement completely customized updating user experiences.
This Quick Start does not use any built-in user interface forms at all. It includes totally custom forms that utilize the methods and events of the Update Controller to perform all of the update related tasks. Specifically:
1. A
custom check for updates form
This form uses the
CheckForUpdateAsync method and the CheckForUpdateCompleted event
to check for updates.
2. A
custom download updates form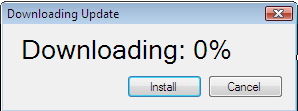
This form uses the
DownloadUpdateAsync method, The DownloadUpdateProgressChanged
event, and the DownloadUpdateCompleted event to download a discovered
update.
3. Once
downloaded, a button is enabled that allows the user to apply the
update.
4. A
custom Update Engine user interface form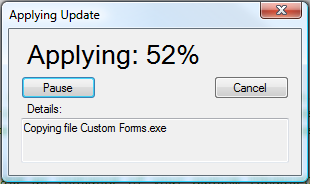
This form is displayed by creating an
assembly that includes a class that implements the
Kjs.AppLife.Update.Engine.Core.IUpdateUI interface.
Enabling the Application
The application is enabled for updates by following the same procedure outlined in the Simple Quick Start. You add an Update Controller to the host application source code, and then use the Set up a new project utility. If you have not yet reviewed the Simple Quick Start, we recommend that you do so before continuing.
Coding the Update Process
Instead of using a built-in user experience as we did in the Simple Quick Start, a custom user interface is implemented here.
1. Create a folder under My Documents and name it Custom Forms.
2. Extract the Custom Forms Quick Start in your preferred language by clicking on the link on the AppLife Make Update start page or the Help > Quick Starts menu.
3. Open the CustomForms.sln Visual Studio solution.
4. Start the solution. When the main form opens, click the Check for Updates button. You will see that the entire user interface of the update process is completely customized.
Checking for Updates
The AppLife Update Controller provides synchronous and asynchronous methods to check for updates. Both methods perform an update discovery task by checking the designated update location for updates. If an update is available for the current version, the CurrentUpdate property of the Update Controller will contain an UpdateInformation structure with information about the available update. If an update is not available, the CurrentUpdate property will be empty or null.
The synchronous CheckForUpdate method returns true if an update is found.
The asynchronous CheckForUpdateAsync method will raise the CheckForUpdateCompleted event when the check is complete.
From AppLife Make Update, click on Help>API Reference and browse to:
Kjs.AppLife.Update.Controller Namespace
UpdateController class
UpdateController Methods
CheckForUpdateAsync Method
Review the documentation for this method. This is the method this Quick Start uses.
5. In
Visual Studio, open the Form1 source code file of the Custom Forms
project. The Check For Updates button handler contains code that
opens the custom CheckForUpdatesForm
6. The
CheckForUpdatesForm contains the relevant code that performs the update
check using the Update Controller.
In the constructor of the form, we
subscribe to the CheckForUpdateCompleted event and we call the
CheckForUpdateAsync method.
7. Once
the form is opened and before the CheckForUpdateCompleted event occurs,
an animated gif is displayed to the user. The user can cancel the check or
close the form. The Download button is disabled until an update is
found.
You can cancel an ongoing asynchronous operation by calling the
UpdateController.CancelAsync method.
8.
Looking at the mUpdateController_CheckForUpdateCompleted event handler,
we can see that we interrogate the CheckForUpdateCompletedEventArgs to
determine the results of the update check. First we see if the operation
was cancelled, then we look for any errors that might have occurred. If
all is good, we can look at the Result property. If an update was
found we enable the Download button and do some work to show the user
what was found. Notice that we look at the CurrentUpdate property
of the Update Controller. If no update was found, the Current
Update property would be empty or null.
This event handler is
guaranteed to be executed on the same thread that started the asynchronous
check. You don’t have to worry about any thread marshalling when using
these asynchronous methods. That is all done by the Update
Controller.
Notice how little work that was actually involved with the
update process. Most of the code that is present involves handling the
form and how we want to interact with the user.
One more item to note is
the UpdateFound event. Though not used in this Quick Start code,
this event allows you to interrogate the update information, and use local
client state information, such as your application licensing status, in order to
select from alternate updates that might be available. The update can also
be canceled, which prevents an update from being discovered. The AppLife
Update API documentation contains more information on this event.
Now
let’s go download the update.
Downloading an Update
Once an update is found, the CurrentUpdate property
contains all the information we need to download, validate, and apply the
update.
The Download Update button click handler instantiates and
shows a new DownloadUpdateForm.
9. Look
at the constructor of the DownloadUpdateForm. Much like the
CheckForUpdate form, we subscribe to events and call an asynchronous
download method. This time we subscribe to an additional event that sends
download progress updates.
We subscribe to the
DownloadUpdateProgressChanged event and the
DownloadUpdateCompleted event.
Then we call the
DownloadUpdateAsync method.
10. When a progress event occurs, we update the text of the information label on the form. Again, this handler is guaranteed to execute on the calling thread, so as long as the initial DownloadAsync method was called on the UI thread, you can safely modify UI controls. The thread synchronization work is done for you in the Update Controller.
11. When the download completed event is handled, much like when the check for update was completed, we check to see if the operation was cancelled and check for any errors. Once the update is downloaded, the controller can validate and apply the update. With the download completed and validated, we enable the Install Now button.
Validate & Apply the Update
Validating the downloaded update uses the public key from
the Update Controller and the signature of the update package contained in the
Director to check the downloaded update package. You can perform
validation manually using the UpdateController.ValidateUpdate
method.
The downloaded update can be applied using the
ApplyUpdate method. This method also performs validation prior to
execution of the update.
Applying an update shuts down this instance as
well as all other instances of the application being updated so that its files
and assemblies can be replaced. Though this Quick Start does not do so,
you can subscribe to the UpdateStarted event of the
UpdateController. This event will be raised on every running instance of
the hosting application. You can perform any work necessary prior to
shutdown, and you can cancel the update from any instance of the
application. If all instances cannot be shutdown, the update will abort
itself.
12. Look at the installButton_Click method. Notice that we validate the update manually before calling ApplyUpdate. Alternately you could call ApplyUpdate and catch any Kjs.AppLife.Update.Controller.ValidationException exceptions.
Like the Simple Quick Start, the AppLife Update project
uses the Add & Replace file action to replace the single CustomForms.exe
file.
13. To customize the Update Engine user interface, we will create a new .Net assembly (.exe or .dll) and create a class that implements the Kjs.AppLife.Update.Engine.Core.IUpdateUI interface. Notice the Custom Update UI project in the quick start solution.
From AppLife Make Update, click on Help>API Reference and browse to:
Kjs.AppLife.Update.Engine.Core Namespace
IUpdateUI Intererface
IUpdateUI Members
This interface is implemented by the Form1 class of the Custom Update UI project. The class code has lots of code comments that provide details on the interface and how it is implemented. To summarize:
•The custom user interface is displayed in the IUpdateUI.Open() method
•The user interface is refreshed in the IUpdateUI.Update() method
•Update completion notification is provided from the IUpdateUI.Finish() method.
•The Custom UI informs the Update Engine of its activity by raising events.
•When the User Interface is closed, the Closed event is raised informing the update engine that it’s okay to shutdown and complete the update process.
•The User Interface can cancel, pause or resume the update by raising events.
14. The customized user interface is imported into AppLife Make Update, making it available to be packaged into an update. This is accomplished through the project settings dialog. Project -> Settings menu option.
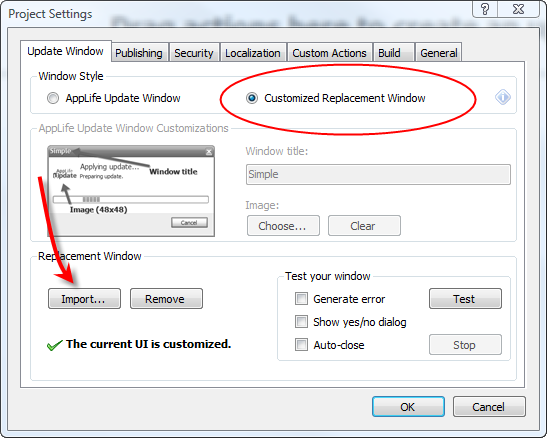
With the customized update engine user interface present, all future updates will utilize the imported user interface.
This Quick Start highlights the manual methods on the Update Controller that allows you to check for, download, and apply updates under a very flexible architecture. A customized update engine user interface was also presented. We used forms to control the process, but no forms are actually necessary. You can mold the update discovery and download features into any visual or non-visual process that best fits your application and your users.