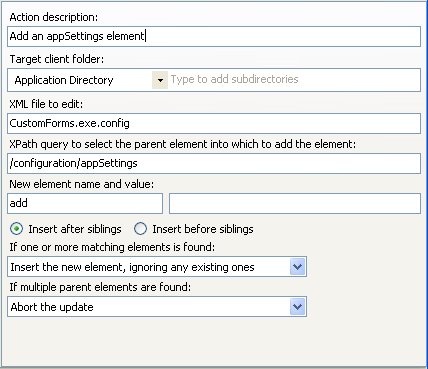
Action description – Descriptive text that can be used to identify this particular action in the Actions list.
Target client folder – The folder on the client where the xml file that is to be edited is located.
Subdirectories – The directory below the designated client root folder to find the xml file that is to be edited.
XML file to edit – The name of the xml file that is to be edited.
XPath query to select the element into which to add the attribute – Use an XPath expression to identify the node within the xml file that you want to add an element to.
New element name and value – Type the name and value of the new Xml Element that you want to add.
If one or more matching elements is found – In the event that one or more elements are found that match the element that is being added, you can choose to:
•Insert the new element, ignoring any existing ones
•Delete any existing elements and then insert the new one
•Do not insert an element
•Abort the update.
If multiple parent elements are found – Identify the action that you want to occur in the event that multiple xml elements are returned by your XPath expression. You can choose to:
•Add the element to all nodes
•Add only to the first node
•Add only to the last node
•Don’t add any elements
•Abort the update.
Expansion variables can be used to set target client subdirectory, file name of the xml file to edit, Xpath query, new element name, and new element value.
See Add Xml Element for more information.