This solution lab provides a working example of an Update Manager application that
utilizes the functionality and features of the AppLife Update controller to manage
updates for multiple independent applications on a client PC.
For organizations that deploy many software applications, it is often desirable
to have a single process responsible for discovering, downloading and applying updates
for all of the organizations software applications. This Update Manager process
acts as a client resource and is independent of the applications that it updates.
The AppLife Update solution provides a solid foundation for building an Update Manager.
With AppLife Update, you can independently create and publish updates for each of
your applications, and have those updates discovered, downloaded, and applied by
an Update Manager.
At a minimum, an Update Manager must be able to:
- Know what applications it is responsible for updating.
- Have sufficient privileges to execute updates for these applications.
- Be constantly available to check for updates.
There are many ways to accomplish these primary requirements. The Update Manager
example application presented in this solution lab represents just one way. The
intent of this example is to demonstrate how to use the AppLife Update API to accomplish
the actions necessary to implement a multi-application Update Manager.
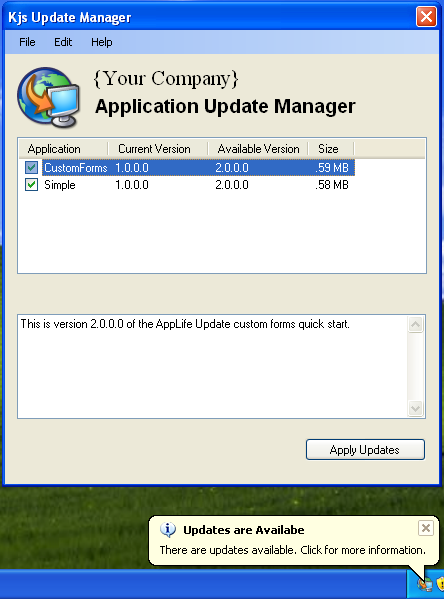
The example Update Manager is a single-instance Windows Forms application that starts
when a user logs on and periodically checks for updates to the applications that
it is configured to update. The application can be started with the user interface
shown or hidden. If updates are available, the user is notified through a system
tray icon balloon that updates are available. This system tray icon is always visible
when the application is running. When the user clicks on the balloon, the update
manager user interface presents a list of updates that are available. The user can
select the updates they would like to apply, and then initiate an update process.
When the update process is initiated, the updates are downloaded. Once all updates
are downloaded, each update is applied one at a time. As you will soon see, the
AppLife Update solution components perform most of this work for you.
The Update Manager application code provides the glue that orchestrates the update
process using AppLife Update.
The example Update Manager configures an AppLife Update Controller for each
application that it will update. The AppLife Update Controller provides the functionality
to check for, find, download, and initiate an update process. The update itself
is actually performed by the AppLife Update engine. The update manager looks up
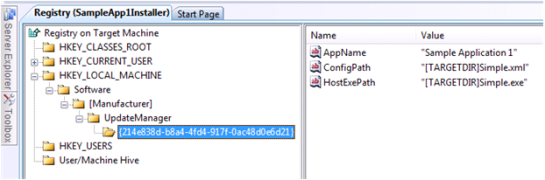
the applications it is responsible for updating from the system registry. Each application
that utilizes the Update Manager adds a registry key and three values to the HKLM\Software\{manufacturer}\UpdateManager
registry key.
string appName = subKey.GetValue("AppName").ToString();
string appPath = subKey.GetValue("HostExePath").ToString();
string configPath = subKey.GetValue("ConfigPath").ToString();
The HostExePath defines the full path to the application being updated. The
ConfigPath defines the full path to an Xml file that contains AppLife Update
Controller configuration information. These registry keys are easily added by an
application installer, and once added, the Update Manager will manage updates for
the application. This is demonstrated in the accompanying downloadable source code
for the two sample applications.
The Update Controller Configuration File
The Update Manager configures the application Update Controller based on the contents
of the Xml configuration file defined in the registry. Each registered application
can be configured separately. The basic information that an Update Controller must
know is the application ID, the location where updates for the application is published,
and the public key of the AppLife Update project file that builds the update package
for the application, so that the update can be validated after download. In addition,
the example includes configuring different permissions elevation scheme per application.
This is discussed in more detail later.
<?xml version="1.0" encoding="utf-8" ?>
<AppReg>
	<AppID>214e838d-b8a4-4fd4-917f-0ac48d0e6d21</AppID>
	<UpdateLocation>http://www.kineticjump.com/...</UpdateLocation>
	<PublicKey>
		<RSAKeyValue>
			<Modulus>xSZbb… oPU=</Modulus>
			<Exponent>AQAB</Exponent>
		</RSAKeyValue>
	</PublicKey>
	<ElevationType>None</ElevationType>
</AppReg>
In summary, to add a new application to the Update Manager:
- Create a configuration file that defines the Update Controller configuration.
- Install the configuration file along with the application.
- Add the keys to the system registry to inform the Update Manager of the application.
The Update Manager will check for updates for all of the applications it knows about.
When the application list from the registry is loaded, an UpdateableApp class
is instantiated that holds an AppLife Update Controller for the application. This
controller performs the update work.
Checking for Updates
At defined intervals settable from the preferences dialog, the Update Manager loops
through each configured application and checks for updates. The Asynchronous update
checking method is used. The method of identifying the current application version
is based on the Assembly Version of the defined host executable. This is common
for .Net applications, but any versioning scheme can be employed. For example, non
.net executables do not have assembly versions, and so you might choose to use file
version instead. (The Update Manager application can update non-.Net applications).
foreach(UpdateableApp app in mApplications) {
//The UpdateableApp class encapsulates each configured application.
  app.Controller.CheckForUpdateCompleted +=
     new CheckForUpdateCompletedEventHandler(Controller_CheckForUpdateCompleted);
  app.Controller.Version = app.Version;
  app.Controller.CheckForUpdateAsync();
}
The update checking process continues until each updateable application’s CheckForUpdateCompleted
event is raised. When all have completed, the results of the checks are presented
back to the user via the System Tray icon, and the Update Manager User Interface.
Downloading and Applying Updates
With the update check completed, the user chooses which of the available updates
to download and apply. The download process is performed similarly to the update
check process, except that only applications that have been selected for updates
are processed. Downloading updates also include progress events to handle. The update
manager displays a single progress indication displaying total combined progress
as each of the updates is downloaded.
foreach(UpdateableApp app in appsToUpdate) {
  if(app.Controller.CurrentUpdate != null) {
    app.Controller.DownloadUpdateCompleted +=
      new AsyncCompletedEventHandler(Controller_DownloadUpdateCompleted);
    app.Controller.DownloadUpdateProgressChanged +=
      new DownloadUpdateProgressChangedEventHandler(Controller_DownloadUpdateProgressChanged);
    app.Controller.DownloadUpdateAsync();
    mDownloadProgressState.TotalBytesToDownload += app.Controller.CurrentUpdate.FileSize;
    //progress is based on all updates to be downloaded.
  }
}
After all of the update packages have been downloaded, the Update Manager proceeds
to apply the updates.
Applying Updates
The process of checking for updates, discovering the right one, and then downloading
the update package is relatively straightforward with AppLife Update. This is true
when integrating updates into a single application or building an Update Manager.
Initiating and executing updates is where the process differs slightly from updating
from within a single application. When update packages are applied, AppLife Update
relies on its ability to shutdown the target application process, and the update
engine knowing the local physical disk location of the target executable. When the
update controller is embedded and executing within the target(host) process, this
information is immediately available. In order for an Update Manager to apply an
update for a separate application, we need to inform the update controller of this
information, and this is accomplished by using the OverrideHostProcessInfo
method.
//This method call sets the Update Controller to initiate an update
//on behalf of the configured application
mController.OverrideHostProcessInfo(ProcessName, AppPath);
The update engine now knows what application to update. When an update is applied
by the Update Manager, the application is restarted only if the update process shut
it down. If the target application was not running, no restart occurs. And finally,
only one update can be executing at a time, so the update manager waits for the
update to complete prior to initiating the next application update. All of this
behavior is manipulated by passing options into the ApplyUpdate method.
mController.ApplyUpdate(options | ApplyUpdateOptions.WaitForCompletion);
//Using ApplyUpdateOptions, the behavior of the AppLife Update engine is defined.
Once the update completes, the Update Manager checks the results of the update process.
The AppLife Update Controller exposes the results of the update through the ReadLastUpdateInformation
method. If the update does not complete successfully the Update Manager logs and
reports the error to the user.
LastUpdate results = app.Controller.ReadLastUpdateInformation();
if(results == null) {
  errors.Add(app.ProcessName, "The application was not updated.");
} else if(results.Result != UpdateResult.Success) {
  //The update did not succeed. Inform the user.
  errors.Add(app.ProcessName, results.ErrorText);
}
Permissions
The update process must have permissions on the client system to perform the actions
necessary to update the application. Using the AppLife Update controller, the options
for permissions are:
- None
The update launches with the identity and permissions as the process initiating
the update.
- Uac
The update will attempt to elevate on Windows Vista and Windows 7. This prompts
the user for permissions or credentials as the update is initiated.
- AppLife Update Windows Service
The update process will utilize the AppLife Update Windows Service to execute the
update with the permissions of the local system account.
To use the Windows Service, an application must be registered with the service.
Registration requires admin privileges to complete and is performed as the application
is installed. This example update manager is designed to run under the security
context of the currently logged on user. Permissions elevation is set independently
for each application through the application configuration Xml file. The Sample
App 1 application installs into the user profile AppData folder. The user has permissions
to replace files in this location and so this application does not request any elevation.
Sample App 2 installs into the program files directory, where a normal user does
not have permissions to update files. So the application registers itself with the
AppLife Update service as it is installed and is configured to use the service to
apply its updates.
Update History
The AppLife Update controller provides a static method to exam the update log files
on the local system for a specific application. The Update Manager utilizes this
feature to provide an update history for each application it updates.
mSelectedApplicationUpdates = UpdateController.GetUpdateHistory(app.Controller.ApplicationId);
This method returns a collection of LoggedUpdate objects that expose information
about the update.

The download for this lab includes source code for the example update manager, two
sample applications, and installers for each to install and investigate. All source
code is in C#.
The AppLife Update controller provides all of the functionality necessary to update
multiple applications on one system. By utilizing the properties, methods, and events
of the update controller API, you can create an Update Manager (or update process)
that best fits the needs of your organization. The example Update Manager described
here, and the accompanying source code provides a starting point for which to create
an Update Manager application.
For answers to questions about this example, please contact Kinetic Jump tech support.
techsupport@kineticjump.com
Download AppLife Update Here