Getting Started - Hosted AppLife Update
Lab Description
This solution lab will walk through the steps necessary to start an AppLife Update
subscription, configure your application to discover updates from the cloud server,
and create an update project to publish updates for your clients to discover and
apply.
Solution Lab
Signing Up
Signing up for Hosted AppLife Update provides the entire AppLife Update solution
plus online update hosting for a low monthly subscription. The subscription starts
at just $20 per month for applications with fewer than 100 active clients. To sign
up, visit the AppLife Update store
and follow the links to subscribe.
When you first sign up, you’ll immediately receive an email that contains:
- Your username and a temporary password (You’ll be prompted to change it on your
first visit)
- Your application ID. This is a globally unique identifier that identifies your
new application
- Your AppLife Update license key
- A link to the AppLife Update cloud. (https://www.applifeupdate.com)
With this information we can visit the AppLife Update dashboard for the first time,
configure the application, configure an application to discover updates here, and
publish our first update.
Log into Your Dashboard
To log in, visit https://www.applifeupdate.com.
Enter your username and temporary password. You’ll be prompted to change your password
the first time. Once logged in, you’ll see your dashboard.
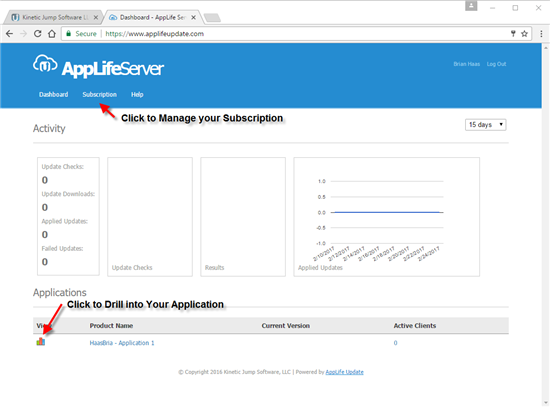
From your dashboard you can manage all of your applications and your deployed client
installations. At this point there isn’t much here to look at. The first thing
we might want to do is rename the application. By clicking the 3 bar icon to the
left of the application name, we’ll open the individual application view.
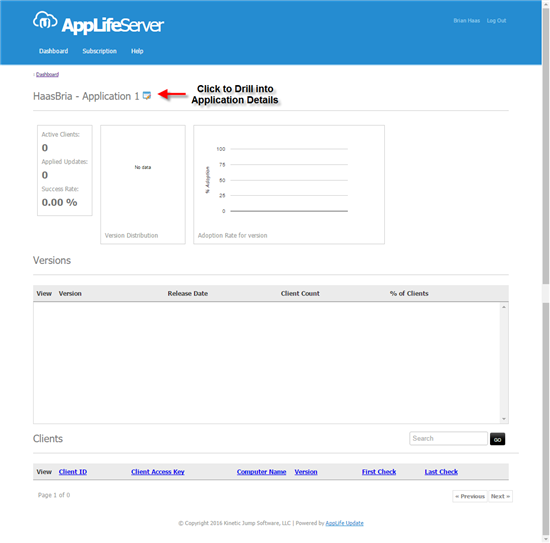
Again, not much to look at yet. But from here, we can access the application details,
where we can change the application name and manage access control at the application
level. Clicking the Application Icon opens the details page.

Here we can change the name to match your application. I’ll change this application
to Solution Lab Example.
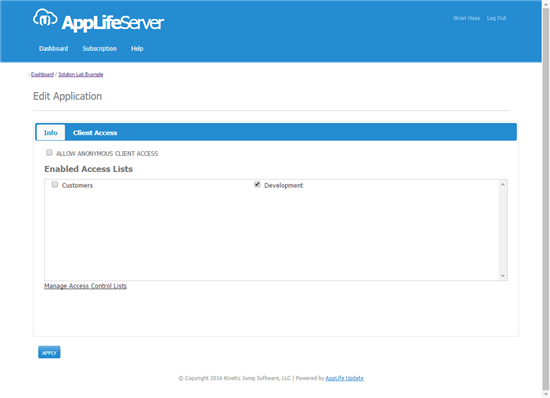
While we are here, let’s look at Client Access configuration.
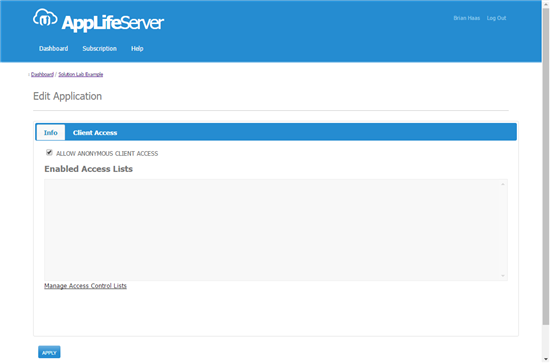
The default configuration is to allow anonymous access. There are two levels of
access:
- Application Level
- Individual Update Package Level
Any access control set on an individual update will take precedent. We’ll set Application
Level access now, and then look at an individual update level control when we publish
our first update. So unchecking the Allow Anonymous Client Access option
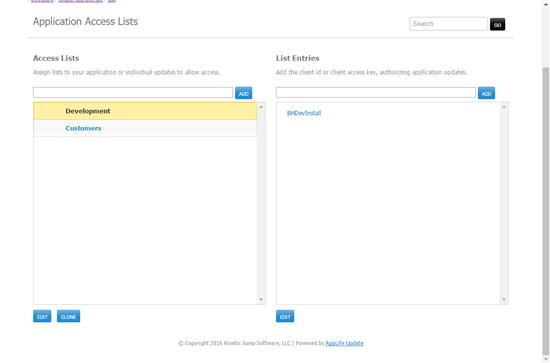
enables the controls to edit Access Control Lists. Clicking to Manage Access Control…
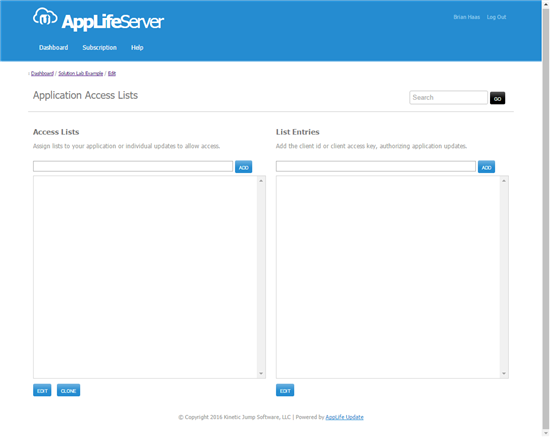
I’ll add two lists:
- Development
- Customers
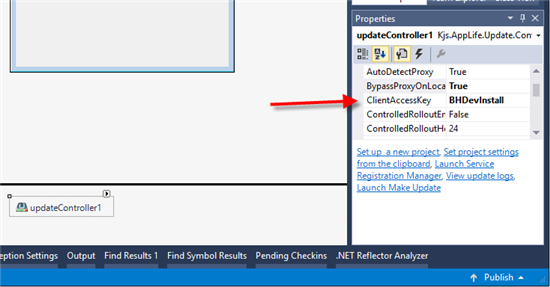
And in the Development list, I’ll add a Client Access Key value of BHDevInstall.
We’ll use this value when we configure our first client to check for updates.
So after editing Access Control, Development entries can access update at the application
level.
Create Your Update Project
If you haven’t installed the AppLife Update software, download the installer using
the link in your email. After the software is installed, apply the license key
that was in your email.
With your software licensed, let’s create a new project file for this application.
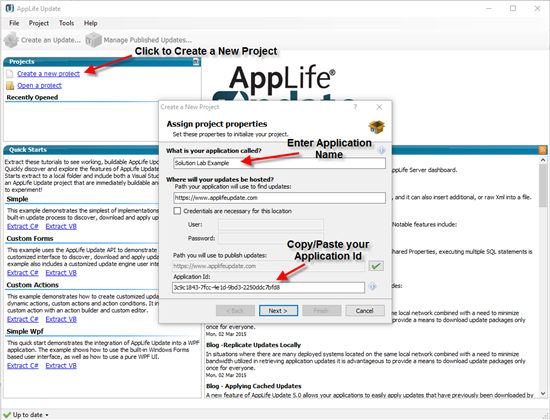
When we create the application project file, we need to copy/paste the application
Id that was provided in your provisioning email. You can also enter your AppLife
Server credentials if you prefer to persist them and not enter them with each update
publish. This is all we need to set. We can accept the defaults throughout the
rest of the wizard.
IMPORTANT: Once you create your project file, back it up to some place secure.
The project file contains the private key that is required to publish and update.
If you lose your update project file, you will not be able to create an update that
your deployed software will be able to install.
Configure Client Software
Your software will use an Update Controller to discover and download update
packages. The Update Controller API is very flexible and can be used in many ways
to manage and maintain software installed on any Windows platform. This solution
lab is focused on getting started with the AppLife Update Cloud and subscription
model and will keep the client integration very simple. With Visual Studio, create
a new Windows Forms application. Open the default Form1 in the designer.
In the Visual Studio toolbox, you will have an AppLife Update section.
Drag from the toolbox an Update Display control and drop it onto the Window.
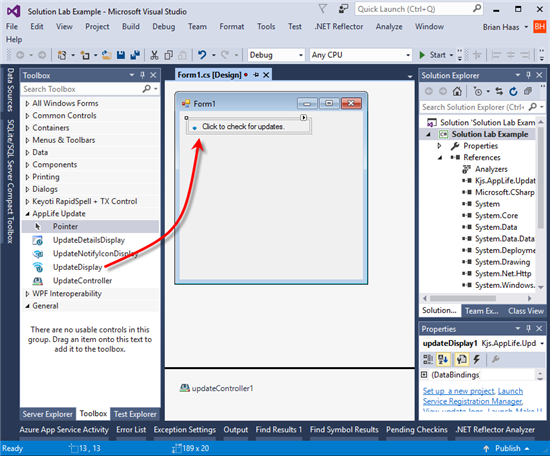
Adding this control also adds an Update Controller. We need to set on the Update
Controller:
- The application id (From your email)
- The Update Location (https://www.applifeupdate.com)
- The Update Project’s Public Key
- The Client Access Key (This is optional, but since we disabled anonymous access,
we need it)
The AppLife Update project has an easy way to set these values.

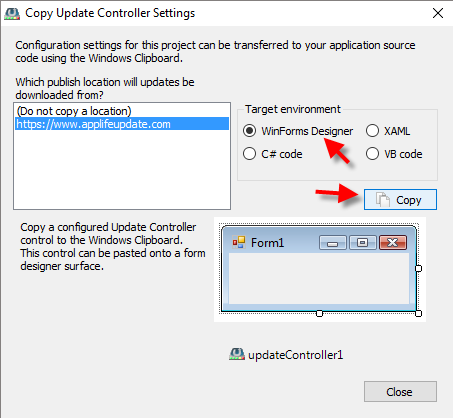
Copy the WinForms designer information to the clipboard. Within Visual Studio,
we can just paste them into the Update Controller designer.
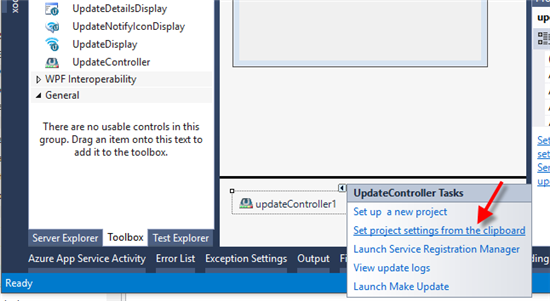
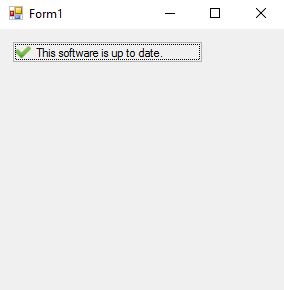
This will set everything we need, except the Client Access Key. If we build and
run now, we would see that this client does not have access.
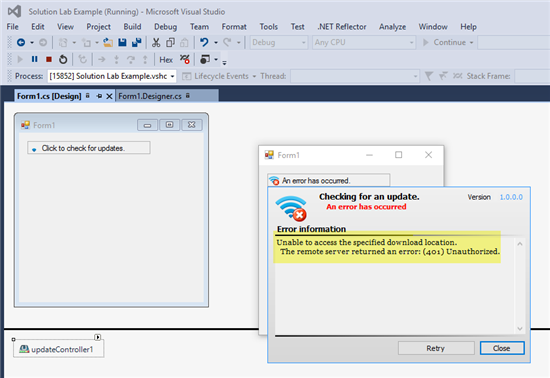
If we add the Client Access Key that we created early within the AppLife Server
Dashboard (BHDevInstall), this client will now successfully be checking for updates.
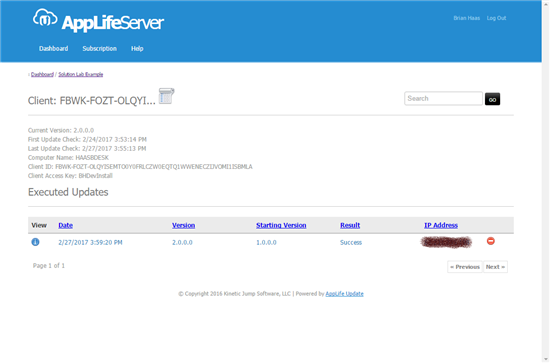
And if we return to the AppLife Server dashboard, we’d see one active client.
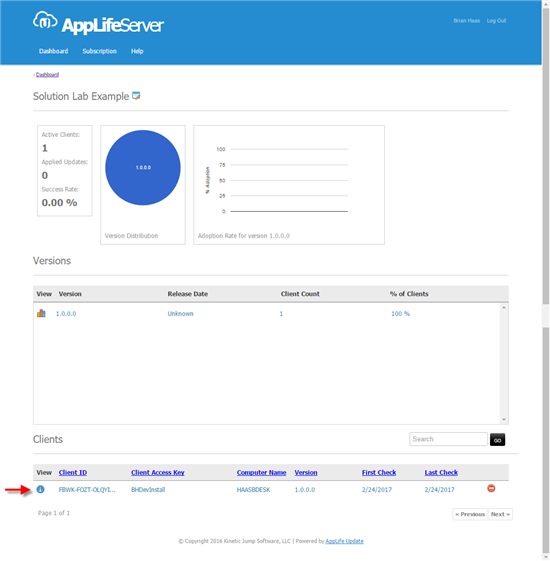
We can drill into that active client by clicking the blue information icon.
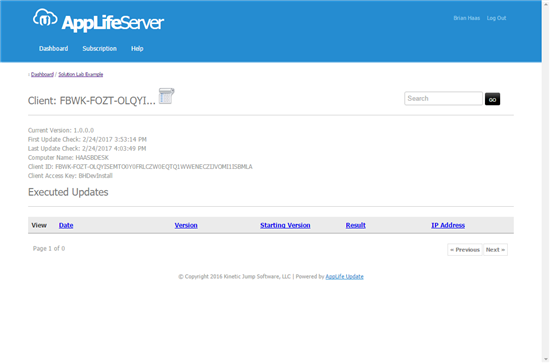
We haven’t executed any updates yet, so not much to see. So let’s go publish an
update.
Publishing Updates
I’ve built a new version in Visual Studio and now will create an update that will
replace the executable. To do, I’ll add an Add & Replace Files action
to my update project.
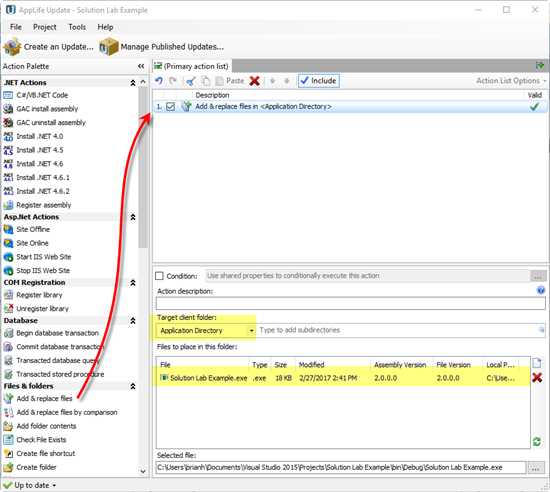
Notice that the Target client folder is set to Application Directory. This
action
will place this file in whatever folder the application is running on the deployed
client. Also notice that the action is picking up the new executable from my Visual
Studio projects bin directory. This path can also be relative to the aup project
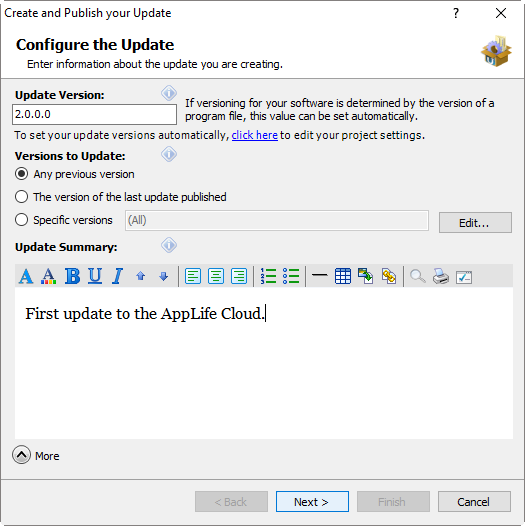
file. So with the update action configured, I’ll publish an update to the AppLife
Cloud. When I launch the Publish wizard, I need to provide a few pieces of information
about the update. The first is the update version that we are publishing. This
is version 2.0.0.0. The next is the target version. What previous versions of
the software can successfully apply this update? Because our example has only a
single executable and we are replacing the entire file, any previous version can
apply the update.
On the next screen, I can specify which deployed clients can see this new update.
To do so, I change the Version Access Mode to Version and I check the Access
Control
Lists that should have access. I can change these settings from the dashboard later.
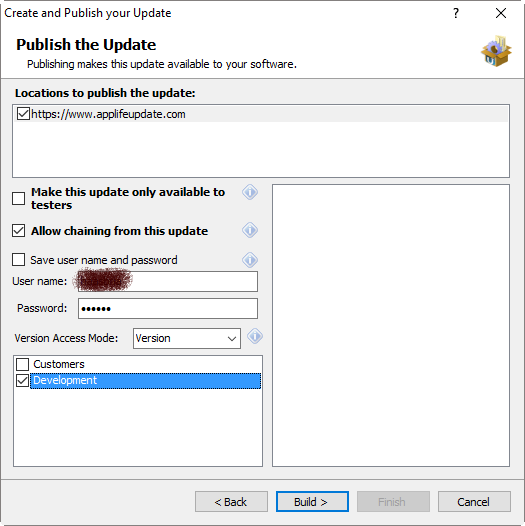
And now to build and publish.
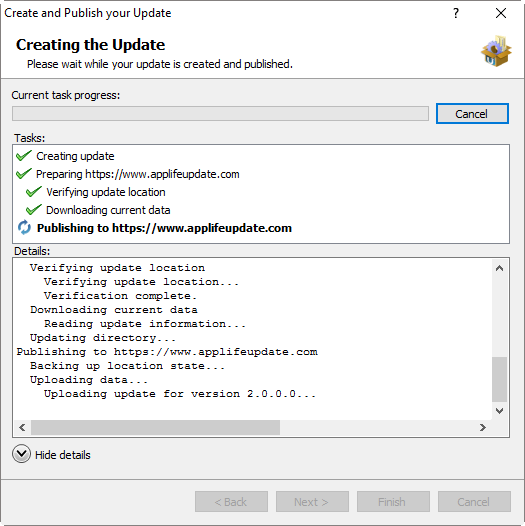
We’ve published the first update. Now our application will be able to see an update
to apply.
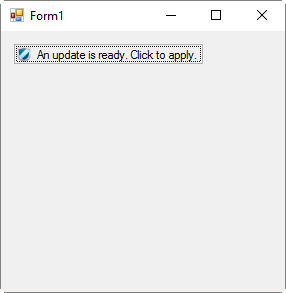
Clicking on the control will shut down the application and initiate the update to
version 2.0.0.0. When the update completes, the application restarts.
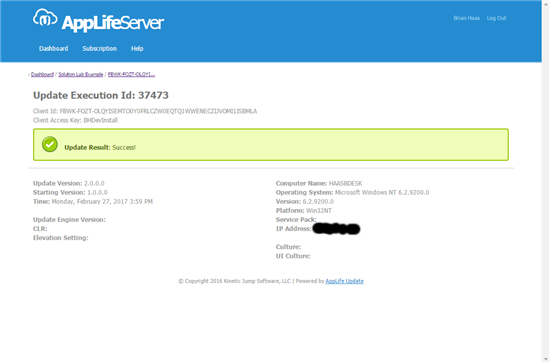
Back in the dashboard, we can see that this update was executed.
Conclusion
It’s quick and easy to get started using AppLife Update Online. After subscribing,
you can quickly configure your application for updating using one of the many built-in
update process controls or use the Update Controller API to completely customize
the process. With a process implemented, building and publishing updates is very
easy using AppLife Make Update.
For answers to questions about this example, please contact Kinetic Jump tech support.
techsupport@kineticjump.com
Download AppLife Update Here